

Setting up your design for Retina images

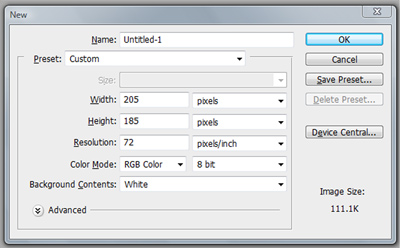
When setting up your file for retina you will need to create the original size of the image. I am going to use Photoshop for this example. Let’s say you are designing a logo or advertisement and the original size is 205px X 185px. You will first begin by setting up a file as the 205px X 185px.
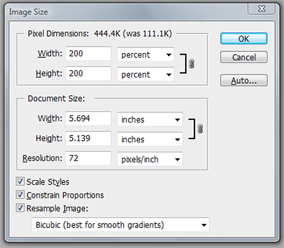
Once you have done that, navigate to Image > Image Size and click the drop down (were it reads pixels) and select percent. Make sure you have constrain properties checked. Type 200 in the box that holds your width size (205px). This should now make the file 410px X 370px.
The reason we do this is because retina images is 2x the pixel density. The easiest way to explain is that a retina display times an image by 200%. The reason images look blurry, while browsing a website with a device that has a high-resolution screen, is because the device is enlarging that image 1.5 to 2 times it’s size.
Once you have finished your design you will save the high-resolution image as “[email protected]”. After that, once again navigate to Image > Image Size and click the drop down (were it reads pixels) and select percent, but this time you will only make the size 50% less and then save for web with file name “advertisement.jpg”. After you saved the 50% smaller image then you will want to CTRL + Z on PC or CMD + Z on Mac. This way you will always have the high resolution image to start with.
Once you have saved your advertisement you can use something like retina.js to implement the images. I am using retina images in this blog and throughout the site so if you are viewing this site on a retina or high-resolution screen you will see the images are nice and crisp. Please leave a comment if you have any questions or I can be of further assistance. Have a Great Day!
Recent Posts


Categories
- CSS3 Tips and Tricks (8)
- IE Issues and Fixes (4)
- Marketing (1)
- Responsive Design (6)
- Web Design Questions (6)
- Web Design tips and tricks (31)
Archives
- May 2015 (1)
- August 2014 (1)
- June 2014 (2)
- May 2014 (2)
- March 2013 (1)
- May 2012 (1)
- March 2012 (1)
- February 2012 (8)
- January 2012 (2)
- December 2011 (1)
- November 2011 (1)
- August 2011 (1)
- July 2011 (2)
- March 2011 (1)
- December 2010 (1)
- October 2010 (1)
- September 2010 (2)
- August 2010 (1)
- July 2010 (3)
- June 2010 (7)
Leave a Reply